Press the small segment that protrudes slightly from the surface, and 4 segments will stick out further. Drag one of these further out, and the top of the egg will lift up. You now need to drag the metal symbols so they line up with the matching symbols on the boards protruding from the sides of the egg. Once all are correct, a different part of the egg will open.
Chapter 8
Also make sure the top-right group has the diamond to the bottom, the candelabra to the left and the fish to the top. Push open the gate when you are done, then go through. Turn right and slide forward the wooden piece, then take the metal grate. Attach the metal rod to this in your inventory, then rotate the metal rod to the right to create a metal grate with lever. Turn back to the left and look up, then focus on the hole in the wooden frame. Pull the lever down and you will swing across to the opposite building.
Chapter 3
Alongside creative and elaborate puzzles, Chapter 5 of The House of Da Vinci 3 also reveals more story-related secrets, specifically those involving the Ordo Iustitialis. Drag the top and bottom horizontal bars to the right, and the middle horizontal bars to the left. Now lift up the main mechanism, and an object will fall to the ground. Look at the drain in the middle of the courtyard, then follow the mechanism over to a pedestal with a pot plant. Turn the left and right roses to left up the side parts of the mechanism, then rotate the central rose.
Chapter 4: Rome (Borgia’s Hideout)
Q & A - Assassin's Creed 2 Guide - IGN
Q & A - Assassin's Creed 2 Guide.
Posted: Fri, 02 Aug 2013 10:11:56 GMT [source]
This will cause the gunpowder to be sifted into four different containers in four different volumes. If you happen to press two chips that don’t have the same image, both chips will reset. You need to match four pairs of images as there are four segments acting as locks for the metal compartment in the middle. If you closely observe the locks, you’ll see that the one lock you can’t move is missing some kind of bolt or screw. As the screw isn’t in this room, you might have better luck upstairs.
More often than not, places marked by various means of lighting tend to contain important tools or have entryways that can be accessed later on. Of course, this doesn’t mean you should completely ignore shadowy corners as they have their secrets, too. Zoom in on the top,you will see a keyhole and behind that a slot with a button.
Chapter 1
Examine the dripping green liquid from near the number III, and collect some in your empty test vial. Go back upstairs and place your filled test vial in the stand behind the microscope. Now look to the left and rotate the mirror next to the flame, to focus the light on the test vial. Use the microscope and turn the lens to focus the image.
The House of Da Vinci 3 Chapter 3 and 4 Walkthrough
Use your ruby-topped gold fitting in the middle of the circle of controls on the right (matching the red half of the shield). Rotate the green circle anticlockwise 90° so the open slot is to the left side. Rotate the red circle clockwise 90° so the open slot is to the right side.
Chapter 4
The House of Da Vinci Review ( Nintendo Switch ) - LadiesGamers
The House of Da Vinci Review ( Nintendo Switch ).
Posted: Tue, 16 Jun 2020 07:00:00 GMT [source]
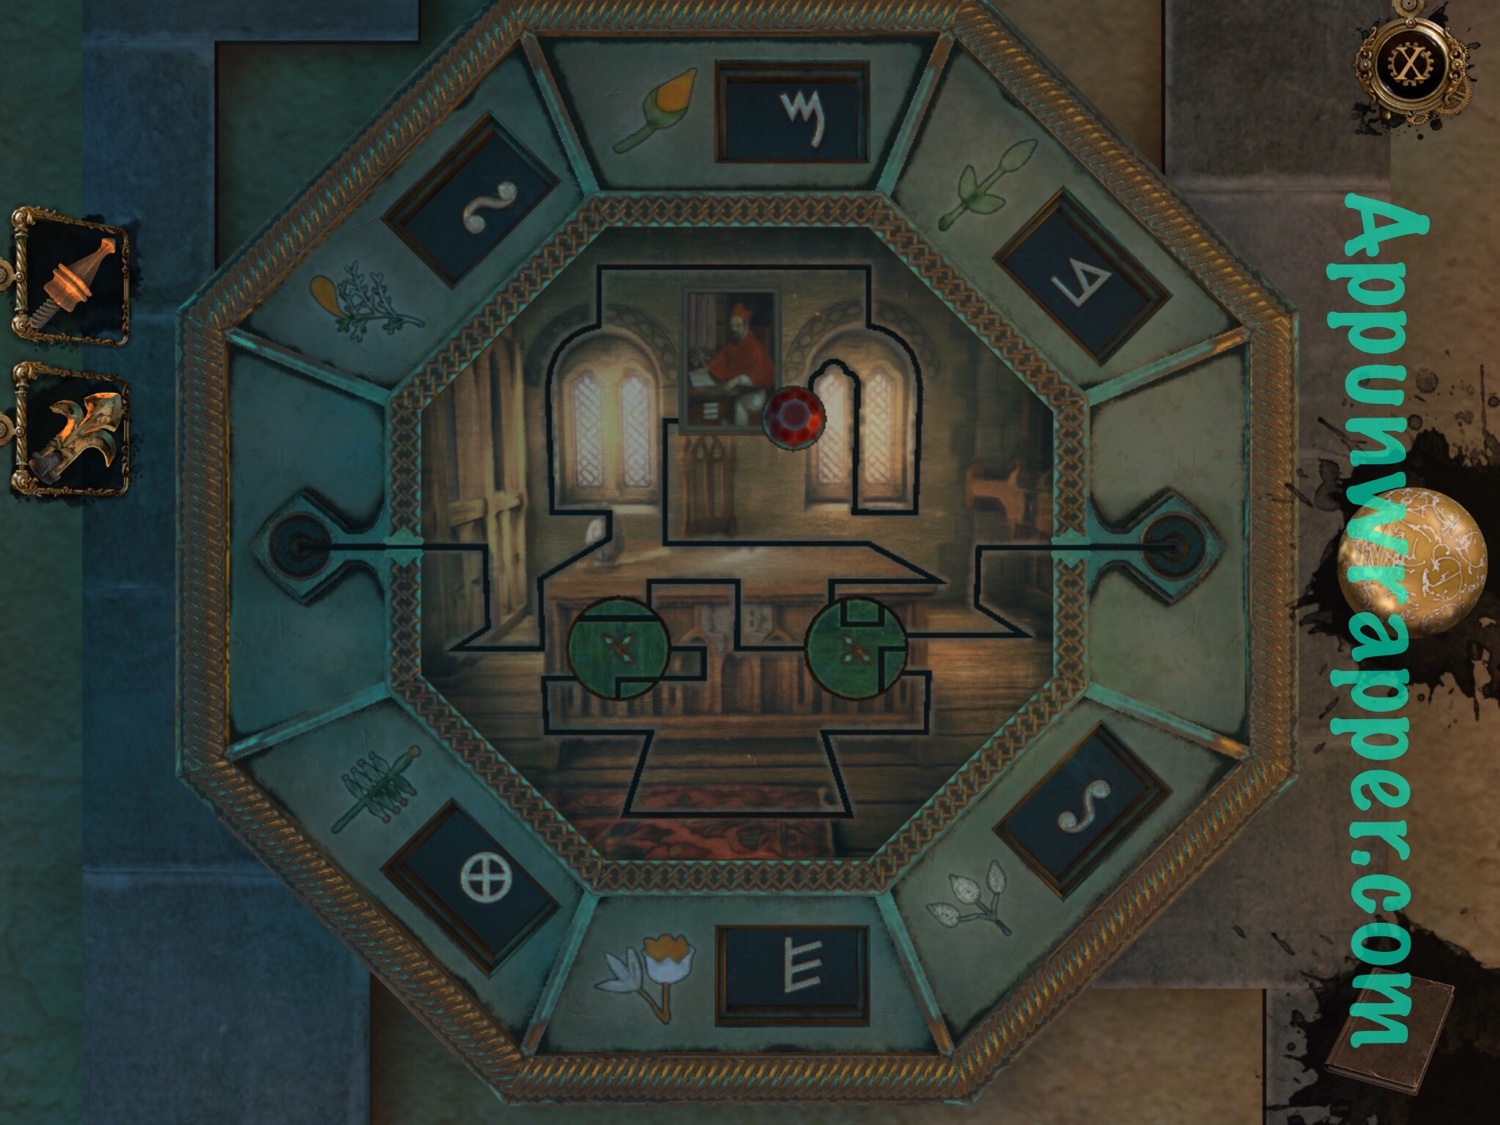
Turn the right dial until you see a partial keyhole, then turn the left dial to see a complete keyhole. Insert your small metal key and turn it to open the chest. Examine this in your inventory - turn the dial on the hilt, then take the ruby-topped gold fitting from the end. Next look at the inside of the lid of the chest. Slide the top and bottom middle diamonds over the scratch marks, then pull open a secret compartment and take a metal lever. Take the scepter-like object, then move the slider behind it to the left.

You’ll see that a small, flat wooden piece will be lifted from behind a red lever to the left side of the mini cannon, thus allowing you to move it. You’ll also see that some kind of ring made of wooden panels at the bottom of the mini cannon falls down. This segment will now close, and the previous one will be active. Look left and pump the handle 5 times so the gauge is completely filled. If they are numbered 1-6 from left to right, use lighters 5, 3 and then 4 - unfortunately the 4th lighter will break and fall off.
As the front discs on the castle rotate, you need to click on each of them to stop them at the correct time; you will then automatically take out the silver dove crank. Use this on the opening just above, then rotate it clockwise to gradually reveal a hexagonal metal block from the top of the castle. Rotate the bottom part to expand the block vertically. Slide the latch near the top upwards, and you will be left with a hexagonal weight. Open the iris, then look at it with the Oculi Infinitum.
Use your key on the rivet and turn it, then use it on the lock and rotate it. You can try to drag any of these two items to fit tools in the lab but they won’t. Thus, go back to the room where the mini cannon is.
This won’t trigger a reaction so zoom out of the switch first and start working the red air pump to the side. Keep pumping until the triangle changes from yellow to blue, then pump again to retract the stick, changing the triangle back to yellow again. This will unlock the Flacon of Gunpowder, which you can collect.
Examine the rose wooden ornament in your inventory and add the brass screw into the back, then rotate this to complete the wooden rose. Go back to the lamp post and insert the wooden rose just above the scroll. You can use the Oculi Infinitum for help if you need it. Look at the top of the ivory case and insert the small key, then turn it.
Seeing as you’re out of danger for now, go to the end of the room and you’ll find a glass case on top of a table with a strange-looking mechanism at the bottom. If you look closely at the case, you’ll see that it contains the glove you’ve been asked by Leonardo to retrieve. There’s one more corner of the lab that’s left unexplored, and that’s beneath the winding staircase.
Examine the folded phoenix head in your inventory, and rotate the top to create a phoenix head. Examine the head with a screw in your inventory, and rotate the top until you create the head of a figurine. Back out and examine the ornate cabinet just to the left. Focus on the bottom-left corner, and rotate the golden segment until a panel below opens. After the next panel opens, also pick up the winged key (5/5).


No comments:
Post a Comment